I think I would want to open the gap wider to make sure I could fill it securely. I'm not sure how you would get the epoxy to the bottom of the gap?
Slow setting and get everything very warm?
Mike
Mast step truss, inevitably:(
-
patentnick
- Posts: 57
- Joined: Tue Oct 23, 2012 11:51 am
Re: Mast step truss, inevitably:(
Well, I had a discussion with a German steel boat owner--and these owners understand rust better that any of us--and he suggested to pour Owatrol oil in the crack. It forms a water-repellent film on galvanised surfaces and neutralises any existing rust, major or minor. The plot thickens  .
.
Nicholas Koligiannis
Moments of Clarity
Hull No. 334
Moments of Clarity
Hull No. 334
Re: Mast step truss, inevitably:(
slow conversation this, but I didn't think you had a rust problem? just the movement in the truss was perhaps a problem?
Mike
Mike
-
patentnick
- Posts: 57
- Joined: Tue Oct 23, 2012 11:51 am
Re: Mast step truss, inevitably:(
Hi Mike:
You're right, I don't have a rust problem. However, Owatrol protects metals from rust, by forming a hydrophobic, flexible film on the surface.
So now, I'm between using this or filling the gap with epoxy (or a flexible sealant?). I don't think that there's movement in the truss. I would have noticed hairline cracks on the edges of the cabin sole. Most likely, the resin pour shrank slightly as it was curing (that's a characteristic of polyester resin) and since it couldn't adhere properly to the metal surface, the gap was formed. Whichever solution I follow, I'm thinking of doing it after stepping the mast so that I can observe how the truss behaves with some force on it--not during sailing of course(!) but at least with the rigging tightened.
N.
Nicholas Koligiannis
Moments of Clarity
Hull No. 334
Moments of Clarity
Hull No. 334

Re: Mast step truss, inevitably:(
I think you’re on the right track. IMHO I'd choose a thickened epoxy paste squeezed or injected into the crack.
Just my thoughts ... keep us posted on how it goes.
Just my thoughts ... keep us posted on how it goes.
Peter http://www.mostlyaboutboats.ca
==================
Victoria, BC, Canada
Albin Ballad Restoration Photo Album
==================
Victoria, BC, Canada
Albin Ballad Restoration Photo Album
-
patentnick
- Posts: 57
- Joined: Tue Oct 23, 2012 11:51 am
Re: Mast step truss, inevitably:(
Hi to all:
Taking a break from drilling the mast for mast steps, internal forestay tangs and running backstays, I decided to check on the forward keel joint. There was just a tiny crack that appeared to be dry and the rest was solid (I worked on the joint with a chisel to make sure, which is why it appears open). I'm really tempted to glass in a couple of layers of biaxial cloth to replace what I ground off, anti-foul and launch. Any ideas and/or objections?
N.
- Attachments
-
- P2042243.jpg (168.42 KiB) Viewed 93918 times
-
- P2042242.jpg (163.67 KiB) Viewed 93918 times
-
- P2042241.jpg (191.17 KiB) Viewed 93918 times
-
- P2042240.jpg (176.49 KiB) Viewed 93918 times
Nicholas Koligiannis
Moments of Clarity
Hull No. 334
Moments of Clarity
Hull No. 334
Re: Mast step truss, inevitably:(
I think I would do just that. It would give me the confidence that it was well stuck together. I wonder how the two halves were attached originally. Is it just filler, and some cloth on the inside?
Mike
Mike
-
patentnick
- Posts: 57
- Joined: Tue Oct 23, 2012 11:51 am
Re: Mast step truss, inevitably:(
Hi Mike:
I actually just did that. I filled the gap with thickened epoxy and then applied two double layers of biaxial+mat fabric (425g biaxial+225gmat) for a total of 1300g. When cured, I epoxy-primed the area and anti-fouled. It's not nearly as thorough a job as Mark's but there wasn't evidence that my problem was as serious as his either. Time--and some hard sailing--will tell.
I'm not sure how the two halves were joined together originally. Maybe there was polyester putty on the outside and layers of fabric on the inside.
N.
Nicholas Koligiannis
Moments of Clarity
Hull No. 334
Moments of Clarity
Hull No. 334
-
patentnick
- Posts: 57
- Joined: Tue Oct 23, 2012 11:51 am
Re: Mast step truss, inevitably:(
Three days ago, with the boat in the water (but the mast still on the hard), I glassed in the new 15mm plywood bulkhead. Again, I applied two double layers of biaxial+mat fabric (425g biaxial+225g mat) for a total of 1300g. Yesterday, I cut off a small section in the middle and created a small channel for any water that may collect under the mast foot to drain directly into the bilge. I decided to block off the original hole on the bottom of the bulkhead, that allowed water to drain from the small forward bilge that's next to the heads. In my experience, any water that collects there is from the hawse pipe, which can be easily sponged off or pumped out with a T from the toilet pump.
N.
N.
- Attachments
-
- P2192253.jpg (143.82 KiB) Viewed 93798 times
-
- P2202254.jpg (144.4 KiB) Viewed 93798 times
-
- P2202255.jpg (125 KiB) Viewed 93798 times
Nicholas Koligiannis
Moments of Clarity
Hull No. 334
Moments of Clarity
Hull No. 334
Re: Mast step truss, inevitably:(
Hi Bob and others
I am in the proces of reinforcing and re-fitting the mast step truss, and I plan to leave the beilge empty. Since mine has almost no corrosion I am planning on reusing. Sandblast, reinforced and regalvanized. No filling material - as I understand you did so as well? It has been some time now since you did yours. Has it worked as planned? Does the bottom seem to handle the pressure?
I am in the proces of reinforcing and re-fitting the mast step truss, and I plan to leave the beilge empty. Since mine has almost no corrosion I am planning on reusing. Sandblast, reinforced and regalvanized. No filling material - as I understand you did so as well? It has been some time now since you did yours. Has it worked as planned? Does the bottom seem to handle the pressure?
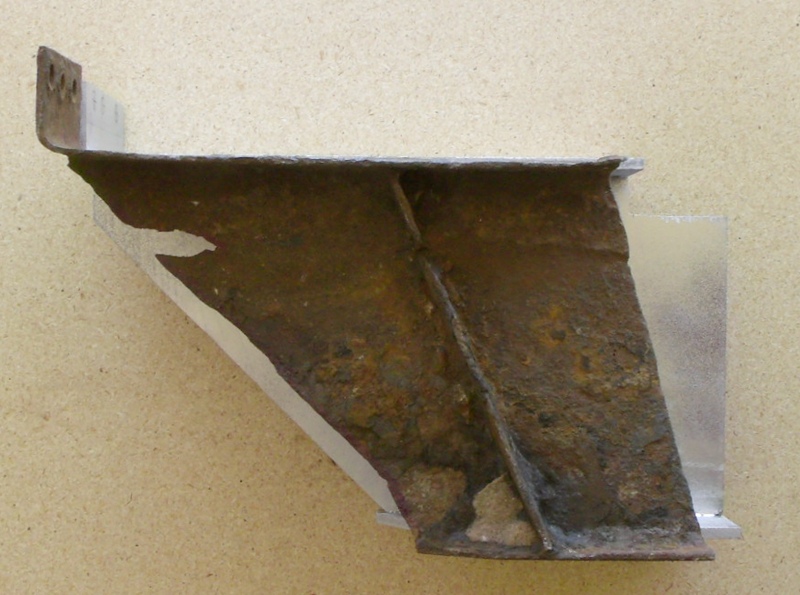
Bob McGovern wrote: ↑Tue Mar 31, 2015 9:48 pm Some more photos of the prototype and where it goes. First, this is how the design drawn above compares to the original truss:
More foot front, back, and sides; more top plate back and sides; more web front and back; more & better lateral stabilizers. The longer web means the truss can be bolted to the bilge divider.
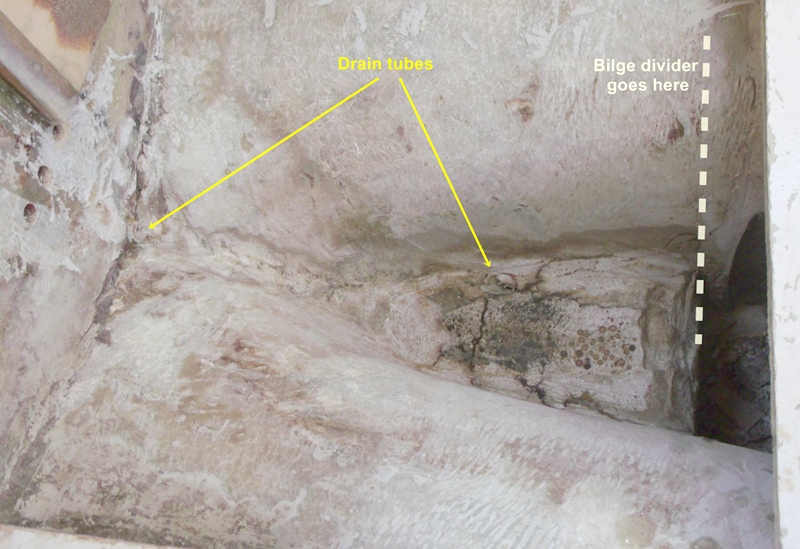
Here is a better view of the cleaned-out recess:
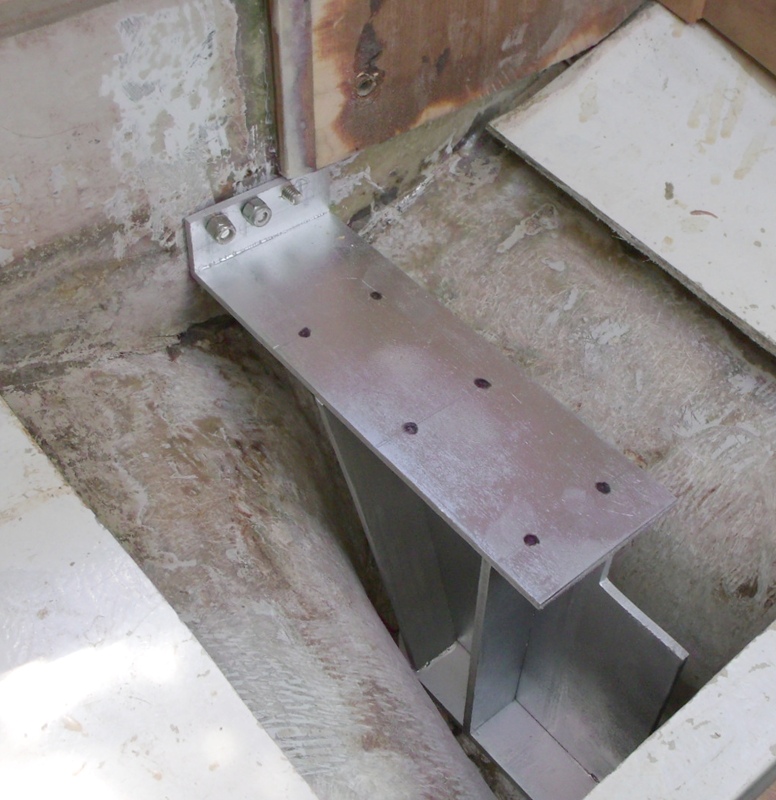
You can see the 'shadow' where the old foot sat, as well as the shrinkage cracks in the resin pedestal. It was cracks like that which allowed water to get into the truss & not escape. You can also see the drain tubes which connect the forepeak & anchor locker to the main bilge. The plastic tube was a casualty of the chipping-out process but will pressed into service once more. Prototype in place (it's only wood, painted silver), with approximate drill locations:
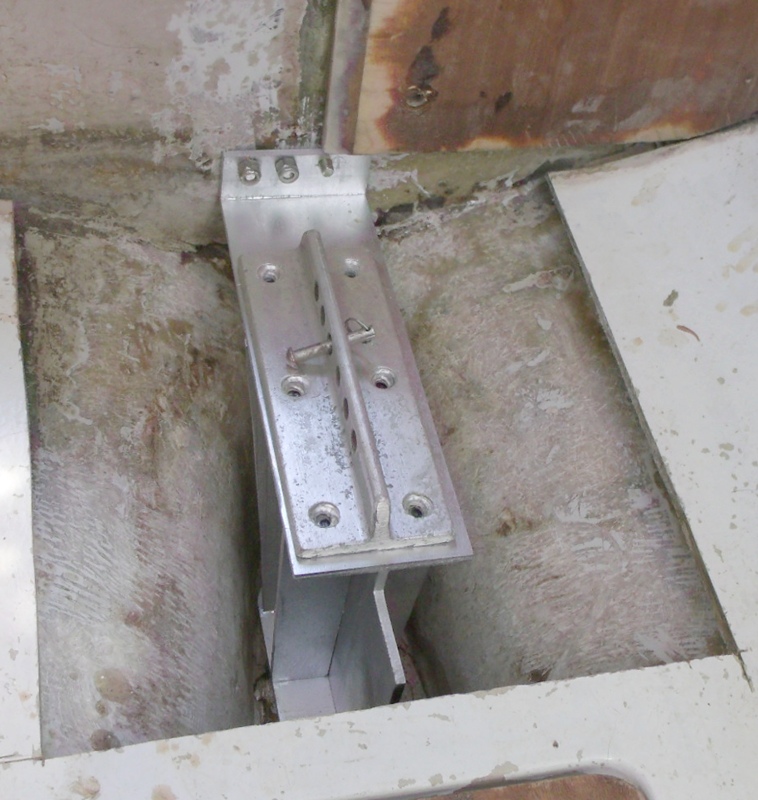
And with the mast base roughly where it will go, barring the GRP 'cap' integral with a repaired sole:

- Attachments
-
- EEEA0C95-A970-45A0-86C5-7D3C91EDBBB0.jpeg (160.97 KiB) Viewed 86947 times
-
- BEA50209-5BAC-428C-9822-E6674B1EA6C0.jpeg (121.42 KiB) Viewed 86947 times
-
- 5494767C-81DF-4B0F-B657-28DEB4FBC78E.jpeg (77.52 KiB) Viewed 86947 times