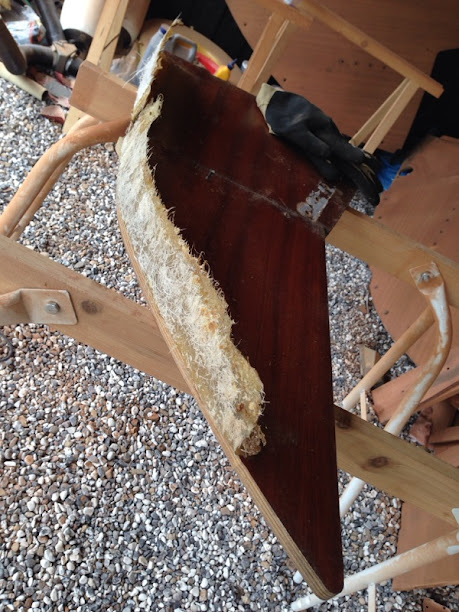
Mads: what you see there is an example of the poor secondary bonding properties of polyester resin. Polyester sticks to uncured (air-inhibited) polyester resin pretty well, so it's good for laminating new pieces. But it's a
lousy adhesive for sticking to wood, epoxy, vinylester, or even fully-cured polyester resin. Looks like the tabbing was added well after the hull layup had cured. That's why it came off in your hands.

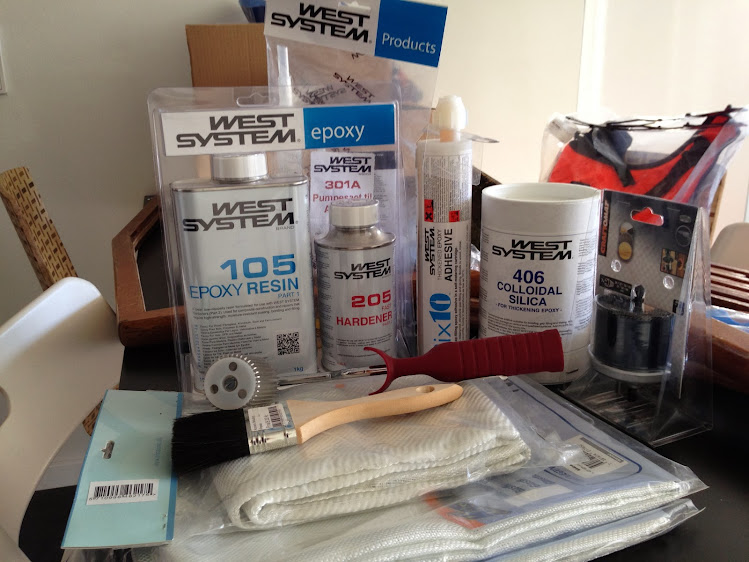
Now epoxy is an
excellent adhesive. Sticks to nearly everything; stays flexible, up to 5000psi bond strength. It does need proper surface preparation to work, tho. First, you'll want to grind the hull back to bare glassfibre. You can do this with a disc sander, an angle grinder, or (my favorite) a diamond grinding cup. You don't want to get too crazy, tho, because that coarse-weave fabric on the inside of your hull -- called woven roving -- is pretty important for hull strength. So I'd actually recommend skipping sanders or grinders for this task & use a stiff wire wheel in a grinder or drill. All you need or want to remove is the paint on the roving, for about 10cm either side of your bulkhead.
Two hints, here: first, mark an offset line (say) 20cm from one edge of the bulkhead before you start grinding and erase all sign of where it goes. When you have bare glassfibre, you can re-mark your guideline from your offsets. Second, wear heavy gloves when using a wire wheel. Hard on bare flesh.
Once you are down to gold-colored resin and roving, and the surface is decently scuffed, you'll want to de-wax the whole area using xylene (or equivalent de-waxer) and a clean cloth. Polyester resin has wax added to make it cure, and this can interfere with a good secondary bond.
You'll also need to grind the plywood down to a bare surface & feel comfortable with its integrity. We plan to both bolt and epoxy all our bulkheads into place. this particular one transfers the force of your aft shroud to the hull, so a firm attachment is more important than easy removal.
Lots of fabrics can be used, from 6 to 18oz. Thinner fabrics are easier to wet out and conform to bends better; thick ones are stronger and reduce the number of layers needed. Glassfiber tape (6" or 8" width) is nice because the edges don't ravel. My preferred material for this job is biaxial tape: this is a heavy (very!), non-woven material consisting of two layers of flat glassfiber set (usually) at opposing 45 degree bias, (usually) thru-stitched to a light epoxy-compatible mat.
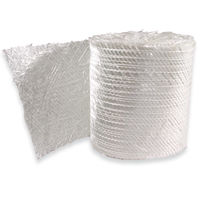
If you can find it, this stuff has lots of advantages. The fibers have no crimp, unlike woven fabric, so they go immediately into tension. Very strong & stiff. It conforms surprisingly well to curves, as the fibers can slide past each other. It builds quickly -- at 17-18oz total 'weight', only one or two layers should be needed. And the diagonal path of the fibers distributes loads extremely well. A 90 degree biaxial tape would also work here, but I bet the bias tape is stronger in practice. Our plan is to tape one face of the bulkhead, let cure, then tape the other face, then drill, seal the hole, and bolt the entire assembly into one big tabbing sandwich. That way, you aren't relying wholly on the glue integrity of the plywood's face veneer to hold the panel captive.
BTW, one trick for wetting out biaxial tapes or cloths is to lay a couple strips of the right length on cardboard, wet out the mat side with a foam roller, flip over the strips, then vigorously roller epoxy into the fiber side until the fibers go almost transparent. It can be hard to wet it all the way thru
in situ. Then, squeegee out excess epoxy with a plastic spreader -- you want as little resin-to-glass as possible for maximum strength. Full wet-out, but no more. You can use the squeegeed resin and a chip brush to pre-wet the hull and plywood before taping. With the bulkhead in place, tuck the tape into the corner and work it gently into place. Two plastic spreaders are helpful, here: one holds the tape into the corner, while the second smooths it down. There will be mess.

Best to lay up all layers on one tab on a single day; as that way they bind chemically instead of just physically. Should be able to lay down 2 layers of biax or up to 4 layers of 10oz fabric/tape at one time, without cooking the lamination. If you can drive the temperature inside the boat for 24 hours or so after the epoxy sets, that will increase it's ultimate strength. Anything from 40-50*C will be great, if you can do it. If not, it's still pretty strong. You'll need to wait a bit before painting if using a urethane paint. Also, rinse the cured epoxy with water and a scrubby pad (Scotchbrite or similar) to remove the amine blush that tend to form on many epoxies, incl. WEST brand.
Best of luck!
 I'm an absolute novice when it comes to working with fiberglass.